Monday, December 28, 2009

Happy Holidays!

Hello Everyone,
I hope that you all are enjoying the holiday season.
We had a very white Christmas here-it was picture perfect.


I am taking a little break for the rest of the week,
but will be back on Monday, January 4th with lots of ideas for your new year!


Tuesday, December 22, 2009

baking day results

The new cookie recipe is definitely a hit- last week, eggnog pie, this week, eggnog cookies.  I don't really care to drink eggnog, but I sure do love the flavor in baked goods-yummy!  This is not an original recipe, but I will post it here giving full credit to Martha.....

Eggnog Cream Melt-Aways
from Martha Stewart Living

2 sticks unsalted butter, softened
3/4 c sifted confectioners' sugar
1 t pure vanilla extract
1 T bourbon
1 t rum extract
2 1/4 cups sifted cake flour
1/4 t salt
1 1 /4 t nutmeg
1/2 c confectioner's sugar (for sifting)
2/3 t nutmeg (for sprinkling)

-preheat oven to 400
-using an electric mixer, cream the butter and sugar until light and fluffy (about 2 min)
-add the vanilla, bourbon and rum extract and blend well
-in separate bowl, stir the flour, salt and nutmeg together
-gradually blend dry mix into butter mixture, stirring until just incorporated
-roll dough into 1 inch balls
-bake about 7-8 minutes, until the cookies are set but not brown
-cool on rack for 5 minutes
-while still slightly warm, roll in confectioners' sugar and nutmeg
(makes about 2 dozen)

I am going to keep the new pie recipe under wraps as of yet.....I think that it's going to be a hit, but I still have a bit of tweaking to do.......

Sunday, December 20, 2009

Baking Day.


My week has been a busy one, and I've been eagerly anticipating my Sunday at home.  It is snowing lightly, and I am working on my holiday baking list all day.  I started the day out by plucking a couple of rolls of Cream Cheese Refrigerator Cookies out of the freezer-it's so nice to be able to pop something in the oven right away to get the baking juju flowing.  Next, I tried out a new cookie recipe, and am about to sample one with a cup of coffee-oh yeah-taste testing is such a tough job.  (notice the telltale empty spot in the cookie line-up below-it looks like Steve beat me to the taste testing.....)

I also have a new pie baking right now, and I'm hoping that it will be a tasty holiday treat.  I have had the recipe hanging around for years, and am finally getting around to trying it.  It is one of those recipes that will either blow my mind, or just be really weird-we'll find out soon!  Stay tuned for details, recipes and packaging ideas!

Friday, December 18, 2009

Friday is PIE DAY!

This is a perfect holiday pie-creamy, fluffy, flavorful and festive.  I discovered it about 5 years ago, and love to make a couple every year for parties or just as a special treat. 


Eggnog Pie
1 c milk
1/2 c sugar
2 T cornstarch
1 t salt
3 egg yolks, beaten
1 t gelatin
1 T cold water
1 T butter
1 t vanilla
1 c heavy cream, whipped
fresh nutmeg
1 baked pie shell

-scald milk in top of a double boiler
-combine sugar, cornstarch, salt and mix
-add dry mixture to the scalded milk, and cook about 5 minutes, until it is thick and smooth
-cook 15 minutes more, stirring constantly
**This process takes some patience, because it honestly seems like an eternity when you are standing at
the stove stirring this mixture-it might take more than 20 minutes.  You want to make sure that the mixture is nice and creamy and thick, or your pie will be slightly runny in the end.  Just hang in there!
-temper the beaten egg yolks with a bit of this mixture, then add all yolks to mixture and cook
3 minutes more in double boiler
-mix gelatin and cold water, then immediately add to mixture
-add butter
-remove from heat and let this cool to room temp

(your cooled mixture should look nice and thick like this.)
-add vanilla and fold in whipped cream

-pour into prepared pie shell, and top with freshly grated nutmeg
-chill and serve!


To prebake a pie shell:

-prepare single pie crust and place in baking pan
-line pie shell gently with foil
-fill with dried beans (or rice, or pie weights-whatever you have)
-bake at 350 for 35 minutes (until crust is nice and golden)
-remove foil and filler
-let cool on rack

Thursday, December 17, 2009

traditions


For many years, it has been an annual tradition to help my mother with her holiday decorating.  As you know by now, collecting and holiday exuberance genes run deep in my family. My parents have an amazing collection of vintage Christmas decorations, and no one is immune from my mother's enthusiasm at Christmas time.   Decorating the house and the tree is no small task, but we put on the holiday tunes, make a pot of coffee, and get to work.  The tree is the main event, but we seem to tuck a little bit of green or glitz in just about every nook and cranny.  Here is a taste of what we did this year.......
The main tree filled with vintage ornaments and piled high with "presents" in vintage store boxes (these are just for show-our real gifts get stashed under yet another tree!)

A detail of the kitchen cupboard filled with 40's, 50's and 60's Christmas collectibles.

Santa peeking out of a vintage sign and a really fabulous 3-D sleigh and reindeer.

Holiday mantel at night, featuring vintage candles, cellophane wreaths, and porcelain faced choir boys.

Sparkly side table.

A couple of prized ornaments displayed in silver compotes and surrounded with bits of glitz.


A festive mix of everyday silver pieces and various styles of  vintage fruit.

Hope this offers a bit of inspiration for decking your own halls!

whew!

ok-I have missed a couple days this week due to frantic pre-holiday events, but that means I have a lot of blogworthy holiday stuff in the hopper.  So, I vow to pack this last week before Christmas full of shiny, sparkly holiday goodness..........
christine

Monday, December 14, 2009

collecting: christmas elves


Sprites, fairies, nymphs, gnomes, elves-under any name, I find them irresistable.  On any given day, a dozen or so of them can be found peeking out from various spots in my home, but at Christmas time they come out in droves.  (what is a group of elves called?  a pack, a herd, perhaps a twinkle?)  They are cute and mischevious, and I love having them about.  My grandmother always had a few hidden around her home during the holidays, and I loved discovering the elves that my parents perched on pictures, light fixtures and deer antlers when I was a child.  At that time, I really thought that they mysteriously appeared overnight (they also moved around from time to time!), so to me, these little guys and gals embody the magical spirit of the season.

Most of the Christmas elves that I collect were made in Japan in the late 50's into the 60's.  They have felt fabric bodies and plastic faces, and most of them are "knee huggers", meaning their legs tuck up under their folded arms so they can easily perch just about anywhere. 
These two cuties are guarding the fruit basket in our pantry.

They're also quite bendable and moldable, so you just never know where they might be hanging out.

These elves can be readily found at vintage stores, estate sales and your parents' basement, so tuck a few around your home, and indulge in a little whimsy this holiday season.


Sunday, December 13, 2009

Weekend DIY: garlands

Here are a couple of quick holiday DIY projects for your Sunday......

I picked up these felt decorations at the craft store (2 for $1) early in the season, knowing that they would come in handy for a variety of projects.  Felt is just such a friendly, happy medium. 

My kitchen needed a little more holiday cheer, so I decided to make a simple garland with my felt snowflakes.  First, I threaded some sisal twine through a large needle, then wove it through the snowflakes, leaving some space (about 3-4 inches) between each one.


Then, for just a bit of sparkle, I glued a small glass ornament into the middle of each snowflake.
This was so quick and easy, but it adds just the burst of color that I needed to complete my
kitchen holiday decorating.


Check your local craft store for similar inspiration, or cut out some paper snowflakes and add a little glitter.

My second project of the day was inspired by a pile of vintage postcards that have been lying around.  I love vintage holiday paper goods, but they sometimes prove to be a display challenge, especially in bulk.
I have been hanging onto a bunch of old curtain clips, just knowing that they would come in handy one day.

A quick (and chilly) trip to the garage for a length of white plant chain, and I had all the ingredients for a super simple, no crafting required, postcard display.  I hung the chain from a cup hook in our entryway, then used the curtain clips to hang the postcards from the chain.

You could also use this method for displaying Christmas cards from family and friends.

Friday, December 11, 2009

Friday is PIE DAY!


My dear friend Lisa came to visit this week.  She arrived from Virginia just in time for our first blizzard of the year, and I thought that devotion such as that deserved a waiting slice of pie and coffee.  We have a history of making custard pies when we are together, especially when I visit her, because they have fresh eggs at their farm.  This time, I decided to change it up a bit.  I have been on an orange zest kick all week -perhaps it's the pleasure of that burst of fresh citrus taste when it's cold and snowy outside-so I added a good dose of it (one medium orange's worth) to my classic custard pie filling.  After pouring the filling into the pie shell, I topped it all of with a pint of fresh raspberries.  It was a delightful treat, and I'm going to help myself to the last slice right now, and wish that Lisa were still here to share it with me.

Christine

Wednesday, December 9, 2009

refrigerator cookies


It took me a long time to warm up to recipes for refrigerator cookies, but I am a full-fledged convert now.  Who can resist the fun of rolling them into cute little packages, then freezing them until you are ready to slice and bake them.  All of those mid-century cookbooks were really onto something when they touted these as the perfect remedy for busy hostesses.  Today I made a cream cheese version that I like, and tried a couple of add-in variations.

Basic Cream Cheese Refrigerator Cookies
1 1/2 c butter, softened
8 oz cream cheese, softened
1 1/2 c sugar
2 t vanilla
3/4 t salt
4 c flour

-cream butter, cream cheese, sugar and vanilla
-mix flour and salt in separate bowl
-add dry mix to wet mix
-stir until well combined
-add chopped, toasted nuts and/or chopped dried fruit
-(see rolling directions below)
-when ready to bake, slice into 1/2 inch discs and place on baking sheet
-bake at 350 for about 12 minutes, until they are golden around edges

Toasting nuts has got to be one of the most glorious things to do to a nut.  Simply spread them in a single layer on a baking sheet, then toast in a 350 degree oven for about 15-20 minutes.  Be sure to stir them a couple of times and keep a close eye on them so they do not burn. 
I then finely chopped about a cup of these toasted walnuts and tossed them into my dough.  Leaving half of the dough with simply nuts, I then added a 1/4 cup of chopped apricots, 1/4 c chopped dried cranberries and 3 t of orange zest to the other half.

Each of these halves then got divided into half and rolled out into a log about
2 inches in diameter and 12 inches long.  (I also rolled a couple of the logs in more chopped toasted nuts)


These logs then get rolled into parchment paper and tied at the ends.  Pop these in the refrigerator for up to a week, or the freezer for up to 2 months, and they are ready whenever you need a couple or a couple dozen.

These also make a lovely hostess gift in their simple parchement and string dress,
 or you can add a festive flair with holiday ribbon and gift tags.

Tuesday, December 8, 2009

collecting: christmas ornaments


Vintage glass Christmas ornaments inspire and amaze me.  My heart races every year as I unpack boxes of these delicate items that have somehow survived their annual coming out.  I wonder who first purchased them, where they bought them (Woolworth's, perhaps) and what their tree and home looked like at Christmas time.  How many hands in how many homes have hung this particular ornament? 
My love of Christmas came from my mother-she still acts like a little girl amazed at all the beauty of this time of year, and her excitement is definitely contagious. 

For many years, I have decorated with a collection of smaller vintage trees, but this year I decided that it was time to have a full size tree again, and to fill it with my antique glass ornament collection.  It's fun to have a small tree (or two) in every room, but there is no sight like a tree filled floor to ceiling with layers of these beauties.

When collecting ornaments, there are a number of different catergories to choose from.  Or, like me, you can not be discerning at all, and just collect them all.  This tree is filled with examples ranging from the Victorian era up until the 1950's.  (I also have a collection of mid-century Shiny Brites, but I don't think those will make it into rotation this year)  My particular favorites are figural ornaments that feature amazing detail and varied themes.
This santa face is especially treasured.

I have a number of musical instrument ornaments, including this guitar.

I'm usually not a fan of clowns, but this cutie came in a box of three, and I think they're pretty swell.

This bouquet of flowers (hyancinths, perhaps?) is also one of my favorites
 due to it's unusual subject matter and unusual coloring.

This skater looks all bundled up and ready for a turn around the rink.

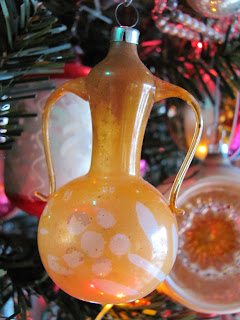
I also have a number of ornaments designed to look like coffee urns and tea pots,and am always amazed that their delicate little handles and spouts have survived so many years.


Whether you display one beautiful ornament in a compote, or dress up an entire tree, vintage glass ornaments are sure to give you pleasure during the holiday season.