Friday, May 28, 2010

Friday is PIE DAY!


Rhubarb.
Finally.
There was nothing else to do but just make a straight-up rhubarb pie.
No strawberries, no custard, no frills. Just rhubarb in a double crust.
First, I slice it into 1/2 (or so) pieces, and toss it with 1/2 cup (or so) sugar.
Let this chill for an hour (or so), then drain.
Prepare the bottom crust and fit into pie pan.
The pie crust rolling scene in my lovely kitchen under construction. A girl's gotta make pie.
Spoon in the rhubarb (about 4 cups total).
Pour 2 cups sugar over the rhubarb (you can increase or decrease depending on your tart/sweet preference).
Sprinkle with 3 T flour
Dot with slices of butter-2 T total.
Sprinkle with your choice of cinnamon, nutmeg or a combo.
I really just waved the cinnamon jar over the pie to give it the idea of cinnamon,
because I prefer nutmeg.  I sprinkled on about 1 teaspoon of that.
Cover with top crust, crimp edges and vent.
Bake at 350 degrees for 60 to 70 minutes, until crust is golden and filling is bubbling.
The pie is still piping hot, but I really, really really want a slice. Patience.
Thanks to my lovely neighbors for the rhubarb and for letting me heat up your kitchen on this already hot day. I'm sure to be sharing this pie.

Thursday, May 27, 2010

Evolution of a planter

For the past two years, a really wide and squat terra cotta pot has lived in front of our house. The first year, it was filled with a giant fountain grass and looked pretty darn cool.  The second year, I planted a dwarf evergreen in it. Apparently, it was not happy in that pot, because it never made it past dwarf stage. It just stubbornly refused to grow, and my hopes of decorating it with lights for the holidays were squelched.  I was so frustrated with it, that I left it in there in the fall, and it soon got covered in snow and forgotten.
Needless to say, my pot full of dirt expanded and contracted in the winter weather and cracked wide open come spring. drat.
Remarkably, it cracked cleanly in half, and I saw potential in those pieces.
The top ring became the perfect collar for a lupine plant in my back garden.  It highlights the plant, and seems to have kept the bunnies from nibbling and the squirrels from digging. My lupine seems undeniably happier with it's new jewelry.
The shallow base piece of the planter lives on a metal stool in the back garden. It is the ideal depth for a mini garden full of succulents.  I filled it with evergreen stonecrop and hens and chicks.
I think I'm actually happier with the pieces than I was with the whole.


Wednesday, May 26, 2010

Garden companions

With the kitchen and bath under construction right now, it looks like you'll be getting a lot of garden posts.  The house is a mess, I can't even boil water (or get water to boil some of the time), and I'm escaping to my gardens when I can. They are starting to fill in quite nicely, and I have a lot of things blooming early.  I snapped a couple of shots of my favorite combos of the moment.

This yellow Columbine is one of my sweetest, most attention grabbing plants. 
 A bright chartreuse mass of Tansy and 'Husker Red' Penstemon make fine bedfellows.
My creeping stonecrop varieties are going crazy in these long sunny days.  Their bright shades of green provide a stunning backdrop for upright 'Black Jack' Sedum.
You may notice a color theme here. I've stuck to a rather tight palette in the front beds to keep things looking cohesive and complimentary to the house.  I have a bed in the back that satisfies my need for bright colors and cutting flowers.

Monday, May 24, 2010

Flower pot combos

This weekend was a very productive one. We are project people. Don't go trying to change us.
Our kitchen and bathroom were being gutted, so I spent a lot of time avoiding the messy indoors, and getting some work done in the garden. I stick to perennials in my garden beds, but love to put together pots of annuals for the front steps and our new (almost finished) deck.
Coleus are always a favorite for pots, and they come in a wide variety of color combinations.  Here, I've centered the pot with purple fountain grass, then added a yellow rimmed red leaf coleus, and a ruffly purple and green coleus.  Yellow flowers kept catching my eye at the greenhouse, so I finished off the pot with some bright yellow accents-yellow lantana and some decorative yellow peppers. 
Big pots of perennials-coreopsis, blanket flower and cardinal flower-were a bargain, but I had already purchased enough new perennials for the year. Thankfully, I struck upon the idea that-DUH-I could use perennials in my pots. Sometimes the most obvious things........
'Thriller, filler, spiller' really is a good rule to follow when filling your pots. Big threadleaf coreopsis(tall, 'thriller')plants will look spectacular in these pots. I surrounded them with more coleus ('filler'), and a sweet potato vine ('spiller')-another favorite annual.
Experiement with different combinations this year, or add a new color to the mix. You'll be rewarded with lush pots full of color all summer long.

Friday, May 21, 2010

Friday is PIE DAY!

My desire for rhubarb pie has nearly reached delirium stage, but the darn stuff has been elusive to me so far. It grows like a weed, and I often see full, luscious red stalks just ignored or *gasp* mowed over, but I still can't seem to get my pie making hands on any.  Ack!  I'm hoping to have time to check the farmers market this afternoon. I have had many requests for rhubarb recipes, and have a long list of new rhubarb pie combos to try.  Soon-I promise!
In the meantime, we'll have to make do with this Almond-Coconut Pie. Oh-the hardship!
This is one from Ken Haedrich's 'Pie' cookbook that I've been wanting to try. The combination of ingredients and ease of the recipe-the filling is all mixed in a food processor-appealed to me.  Most of these ingredients will be in your fridge or pantry (you might have to pick up heavy cream), and it really is super easy to make.  It is easily the thickest pie filling that I have ever encountered, in fact, it looks and feels much more like a muffin batter. 
Not surprisingly, this pie turned out to be more like a cake (or muffin, or quick bread) in a pie crust.  It has a beautiful brown top and a light, slightly crunchy texture to the filling, and is just generally a good looking pie.  The flavor and texture are fantastic (more almond, subtle coconut), and I love it still a little warm from the oven.  I chose to top it with a little cinnamon whipped cream to go with my afternoon coffee. A big slice with a latte would also make a fabulous breakfast treat!

Almond-Coconut Pie
from 'Pie' by Ken Headrich

1 single 9" pie crust

1 1/2 cups sliced almonds
2/3 cup sugar
1/4 cup all-purpose flour
1/4 cup sweetened flaked coconut
1 1/2 teaspoons baking powder
1/4 teaspoon salt
1/2 cup (1 stick) unsalted butter, at room temp, but not too soft
2 large eggs
1/2 cup heavy or whipping cream
1/2 teaspoon vanilla extract

-prepare the pastry and fit into pie pan
-place in the freezer for 15 minutes
-preheat oven to 400 degrees
-combine the almonds and sugar in a food processor and pulse 5 or 6 times to partially chop the nuts
-add the flour, coconut, baking powder, and salt and pulse until the mixture is well combined and the nuts
are more finely chopped
-add the butter in 3 or 4 large pieces and pulse until well incorporated
-add the eggs, cream, and vanilla and process until well blended, 6 to 8 seconds
-scrape the filling into the pie shell, smoothing the top with a spoon
-bake for 15 minutes
-reduce heat to 350 degrees and rotate pie 180 degrees
-bake until filling rises somewhat and is set (not wobbly), 25 to 30 minutes
-transfer to wire rack and cool
-serve just warm or at room temperature

Wednesday, May 19, 2010

Going Green

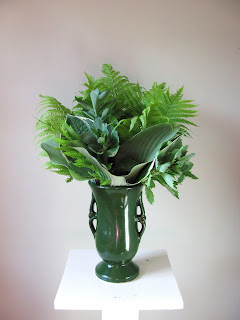
Spring has put me in the mood for fresh picked bouquets.  Now that the lilacs are gone and the bleeding hearts are fading, the availability of blooms is slim.  My plants are growing and filled with buds and promise, but it will be another couple of weeks before I have a lot of colors to choose from. However, if you stretch your mind a bit, there is always something worthy of a vase.
Inspired by a beautiful deep green vase that I received for a birthday gift, I picked a handful of green this morning.  I love the freshness and the monochromatic palette of this bouquet. I started with a backdrop of fern leaves, then added two varieties of hosta leaves.  Autumn Joy Sedum stalks, still in their spring green suits, add another shape and texture, and a few more fern leaves finish off the look.
The garden always holds possibility.

Tuesday, May 18, 2010

Spring Salad


Here is a simple salad for your spring and summer fetes.
Millet and Fresh Herb Salad

1 c millet (you could also use quinoa or couscous)
2 c water
1/4 t salt
1 can chickpeas, drained
2 carrots, cut into small cubes
1/2 c fresh herbs (I used chives, parsley and cilantro), chopped
1/2 c olive oil
1/4 c fresh lemon juice
2 T red wine vinegar
salt and pepper to taste
-bring millet, water and salt to boil in a saucepan
-simmer over medium heat for about 20 minutes
-remove from heat, cover, and let cool
-combine cooked millet, chickpeas, carrots and herbs
-in separate bowl, whisk olive oil, lemon juice, vinegar, salt and pepper
-pour over salad ingredients and stir well
-refrigerate for 1 hour to overnight
(add sprinkles of olive oil and toss well if it seems a bit dry)

I changed up the leftovers today by adding some crumbled feta cheese, chopped tomato and cubes of salami! It made a pretty yummy brown bag lunch for my sweetie!


Monday, May 17, 2010

Friday is PIE DAY! (except when it's Monday)

Sometimes life gets in the way of pie.  Last week was so jam packed with work projects, that I found myself with no time for baking.  However, Sunday was a lovely respite.  I was able to relax and catch up with things around the house. I baked a pie loaded with fruit and redolent of summer. It was the perfect finish to an al fresco meal with friends last night. So, better late than never, here is the pie.
Cranberries may seem like an odd choice for a spring fruit pie, but I am determined to break them out of the Thanksgiving rut.  I stock my freezer with bags of them to encourage myself to bake with them year around. Their tang seemed like the perfect match for the sweet taste of strawberries. I had my heart set on some fresh apricots to finish off the fruit trio for this pie, but came up empty handed at the grocery store.  They did have something called an aprium, a cross between an apricot and a plum.
How these exactly differ from the wildly popular pluot I am not sure. I still would have preferred good old apricots, but lacking that option, decided to try the apriums.  The cashier was really excited about them, so that was a bit reassuring.  They did add the firmness and color variation that I was looking for, resulting in a lovely and tasty fruit combination.
In the world of pie, you can't get much more perfect than a bunch of fruit baked between two flaky pie crusts.  We sliced it while it was still warm, so it was a juicy, fruity, yummy mess. 
Topped with a scoop of vanilla ice cream, it was a delicious way to celebrate a warm May evening.

Triple Fruit Pie

2 cups whole fresh (or frozen, then thawed) cranberries
1 lb fresh strawberries, hulled and sliced
4 apriums (I would still go with apricots if I had them, but experiement as desired), pitted and sliced
1 1/2 cups sugar
4 T flour
2 T butter
1/4 t freshly grated nutmeg

double 9" pie crust

-toss fruit with sugar and flour
-spoon into prepared pie crust
-dot top with butter
-grate nutmeg over top
-top with crust, crimp and vent
-bake at 350 degrees for 1 hour, until fruit is bubbling and crust is brown

Thursday, May 13, 2010

Collecting: Shell Jewelry

As it always seems to happen with me, my collections start out with a couple of items.  Before I know it, those two or three items have multiplied into twenty or thirty, or, um, maybe fifty or sixty.  Once I have an item in my brain, I seem to be preternaturally drawn to every other one in the world (or at least in my immediate circle).  Call it obsessive-compulsive. Call it having finely honed gathering skills. Call it fun.
Jewelry, as you have seen here before, is one such collection.  Shell jewelry is a sub-category of this collection.  I could probably break that down into sub categories of the sub category, but I'll spare you that.  Can you tell that it's been a busy week?  I'm getting a little loopy.
Yes. So. Back to shell jewelry.....
Some of these pieces are quite gaudy, and some are intricate examples of beautiful handiwork.  They are all lovely and wearable, and especially well-suited to the colors and fabrics and feel of summer.
By the way-I picked up this hanging pocket thing at a thrift store, and I have been looking for more ever since.  It's perfect for letting me store this collection neatly, while still being able to see it all the time.  If you ever see one, send it my way.  Although, I have a feeling that you might hang on to it and stash your own goodies in it........

Wednesday, May 12, 2010

It's the little things.....


I don't have any great recipes or information packed posts today.  Just a couple of tiny little things that are making me happy this week.  My mother recently gave me a whole box of my childhood toys and such, and I've been sorting through them.

This wee set of flower power pans were one of my favorite toys. Hmmmm.....apparently cooking has always been a thing with me.  I'm so happy that my mom thought to save them, and now I can have them on display in  my studio.  Looking at them every day makes me smile. 
These tiny glass-yes glass! bowls-a salad set?-are so ridiculously cute and teeny
 that it sort of boggles my mind. 


Tuesday, May 11, 2010

Candied Citrus Peel

Last week I made candied citrus peel for a top secret project (you'll find out at some point, I promise!).  Usually, this is something that I only think to make around holiday time (a clue to the top secret project), but it has struck me now that this is a tasty treat any time of the year. Dipped in chocolate, it makes a super cocktail nibble or dessert buffet extra.  Pop a piece of candied lemon peel on top of a lemon cupcake, and you've got summer dessert nirvana. Or, how about a piece of candied orange peel dropped into a little tequila on ice? Yum, yum, yum! The possiblities are endless.

The process is relatively simple, but it takes some time.  This is best to do when you have a day at home so you can do each step between other activities. 

Candied Citrus Peel

5 medium oranges or 6 lemons, or a mixture!
2 cups sugar
1 1/2 cup water

-wash the fruit and dry thoroughly
-slice the end of each fruit, then make vertical cuts through the peel, about 1 inch apart
-carefully peel off the sections, then trim away as much white pith as you can
-cut these peels into narrow strips
-cover the peels with water in a small saucepan
-bring to a simmer and cook for 20 minutes
-drain
-in saucepan, stir together 1 1/2 cups sugar and the water
-cook over medium heat until the sugar is dissolved
-add the peels and simmer about 40 minutes, until translucent
-place a cooling rack over a cookie sheet and transfer peels to the rack
-let cool for 1 hour
-roll the peels in 1/2 cup sugar in bowl
-lay in single layer on wax paper
-let dry completely, about 4 hours

These can be stored in an airtight container at room temperature for one month.

Monday, May 10, 2010

My top 5 perennial picks

Gardening season is in full swing, and I keep adding a few plants here and there to my garden.
I try new plants every year, but I have my favorite perennials that I use over and over again.
Here is a beginning list of my top 5 picks. These are based on performance over the years in my own gardens. They are all low fuss, low maintenance plants that add interest to the garden for an extended amount of time. 
Autumn Joy Sedum
This has become one of the most popular perennials in recent years, and with good reason.
It is extremely forgiving, drought tolerant, and grows well in most any soil.  It does the best in full sun, but is very tolerant of partial shade.  Autumn Joy comes out early in the season and grows rapidly, creating pleasing mounds of succulent green leaves by June.  It flourishes all summer long, then begins to deepen in color during the fall, adding wonderful color to the Autumn garden.  This is one of the few plants that I do not cut back in the fall, because the tall bare stalks add interest to the Winter garden.  It's really a 4 season charmer.  Once this plant is established, it can (and should) be divided regularly.  It's easy to do and will allow you to add more plants to your garden or share with friends and neighbors.
Lady's Mantle
Lady's Mantle is one of my very favorite plants.  Although a staple in English cottage gardens, it does not seem to enjoy the same popularity in the States.  This is another easy to grow plant that does best in full sun, but will tolerate partial shade.  I love this plant because it forms a lovely compact mound of frilly leaves that hold droplets of water when it rains.  In late May to early June it sends out frilly yellow blooms on long stalks, adding even more interest to this sweet plant.  Once the blooms are spent, clip them off, and you will enjoy the foliage late into the fall, when it yellows.  Your plants will send out little offspring that are easy to move and are quick to develop into new plants.These are a wonderful choice for a cottage garden, border, or even a more manicured garden bed.
Mountain Bluets
These plants are also know as perennial Bachelor Buttons.  I can't believe how fantastic these are.  Their elongated leaves come out in early spring and quickly grow to 12-14".  Mine are already blooming profusely this year, which is amazingly early.  The flowers are rather delicate and a very brilliant blue, and look great in cut arrangments.  The really fabulous thing is that, with regular deadheading, these plants will flower from June until September!  Yup, you heard me right.
Penstemon-"Husker Red"
Another early riser, Penstemon's green and red foliage will look great in the Spring.  By mid-summer, they have tall white to light pink flowers that last through early fall.  Cut the flowers back when they are spent, and the foliage will deepen in color and stay lively in the Fall garden.  These grow about 2 feet tall, so are wonderful for a back border plant or as a tall accent plant in your beds.
Creeping Sedums
I cannot get enough of these, and it seems like I find a new variety every time I turn around.  Green, red, chartreuse, silver-add one wherever you need a little fill in, low mound or bit of color and texture.  They really go crazy in rock gardens, creeping and crawling and mixing to create a lush carpet among the rocks. 
They are also fabulous for planters, adding texture and spilling over the sides of your pots.  They are totally forgiving (if they creep over to a spot you don't want them in-just pluck them out) and easy, easy, easy to grow.  Get some now.

As I said, these favorites are based on performance in my own gardens-they've really become tried and trues for me.  If you have questions about use in your own gardens, or about details that I may have missed, please e-mail me and I will try to help you out!

Friday, May 7, 2010

Friday is PIE DAY!

This week's pie was inspired by 3 things.  First of all, I had about a cup of dates left over from last week's baking.  Not that I can't eat a date all on it's lonesome, but they just seemed to be whispering their desire to make it into a pie.  Secondly, I recalled a date and orange pie recipe that I had seen in a church cookbook. My recollection was of this pie being a custard like filling, and I wanted to switch that up a bit, and add some coconut (is it coconut or cocoa-nut?). My third inspiration was a method used in the mini cakes that I made last week.  I liked the idea of mixing the egg yolks in with the main stuff, then beating the egg whites and folding them into the filling.  This creates a sponge-y, or cloud-like, layer on top of the pie.

Date Coconut Cloud Pie

1 9 inch pie crust
1/2 c butter
1/ 1/4 c sugar
4 eggs, separated
1 c chopped dates
1 c coconut
1 T orange zest
2 T orange juice concentrate

-cream butter and sugar
-add egg yolks and blend thoroughly
-stir in dates, coconut and orange
-beat egg whites in separate bowl until stiff peaks form
-fold egg whites into date mixture
-pour into prepared pie shell
-bake at 300 degrees for 50-55 minutes
I LOVE it when a pie surprises me, and this one certainly has.  Honestly, I wasn't sure if this one would pan out.  It seemed like it might be a pie that was good enough, but nothing great.  Wrong.  I love this pie.
Make one for your mother this weekend, and she'll know that you love her.

Wednesday, May 5, 2010

Cran-Walnut Chocolate Cookies

Another cookie recipe!  There's no stopping me now-the cookie monster has been unleashed.
I used to make these cookies a lot, but the recipe somehow got pushed to the back of the recipe box.
It seemed like it was time to dust it off and give them a whirl again.  As I was stirring up the dough, I kept thinking "Oh yeah-these cookies-now I remember."  When S tasted the first one, he said, "Oh yeah-these cookies."  All good memories, of course.  Stir up a batch and add them to your own memory.

Cran-Walnut Chocolate Cookies

3 c flour
1/2 t salt
1/4 t soda
1 t baking powder
3/4 c butter
1 c brown sugar
1 c sugar
1 egg
1 cup fresh cranberries
1 c white 'chocolate' chips
1/2 c chopped walnuts

-mix dry ingredients together in a large bowl
-cream butter, egg and sugars together in separate bowl
-add the wet mix to the dry mix and combine well
-stir in cranberries, walnuts and chips
-form dough into balls (about 1 1/2 inches in diameter)
-bake at 375 degrees for 12-15 minutes, until lightly browned
-cool on wire rack

Ok-I am telling you now that this dough will seem a bit weird and dry.  Trust me.  It will all work out.
You have to form the cookie balls in your hands by really squishing it together.  The dry to wet ratio is strange in this recipe. Combined with the baking powder, this gives them a unique puffy and crunchy, yet soft in the middle texture.  I think the moisture in the cranberry juice is what tips the scale to perfection.

Monday, May 3, 2010

Dessert Tapas

As I mentioned in my PIE DAY post, we were lucky enough to attend a wine-tasting party on Friday night.
The wine of the night was Tempranillo, a Spanish red, and the food was a wonderful spread of Spanish influenced Tapas.

It may not surprise you that I am often asked to bring dessert to parties, and this time I stretched my usual repertoire to try my hand at creating some dessert Tapas. I love being inspired to try new genres and recipes.  Fussy appetizers and bite size dishes are really not my thing-I'm not going to spend hours stuffing or piping complicated fillings into something tiny, then rolling that in something else and tying it all together with a chive bundle.  No way. Simple and tasty-that's my style.

Almond and orange immediately came to mind for complimentary tastes to the theme, and mini cakes seemed like a good vehicle for these two ingredients.  Remember, I wanted to keep this simple, so I decided to go flourless-fewer ingredients and dense cakes that deliver a punch in a couple of bites.
(I have NO idea why there is a blank spot in that pan:)
Here is my version, which was super tasty, but may need a bit more tinkering.
Try it and let me know what you think.

Flourless Orange Almond Cakes

1 c blanched slivered almonds
6 eggs, separated
1 c + 2 T extra fine sugar
2 thin strips of orange peel, blanched

-pulse almonds in food processor
-add orange peel, and process until finely ground
-add egg yolks and sugar
-pulse and scrape as needed until well combined
-transfer mixture to a bowl
-beat egg whites in a bowl until they form stiff peaks
-fold egg whites into almond mixture
-spoon batter into mini cake tins with paper liners
(you can also make one big cake in a 9 x 13 pan, greased and floured)
-place in preheated 400 degree oven, then lower heat to 350 degrees when cakes go in
-bake mini cakes for about 15-18 minutes, and large cake for about 30 minutes
-cakes should be brown and toothpick inserted in center should come out clean
-dust cakes with powdered sugar or serve with whipped cream

I also wanted a dessert with a little bit of spice or smoke, so I turned to one of my favorite candy books.
Brittles, Barks and BonBons by Charity Ferreira provided the perfect recipe.

Spanish Almond Brittle
from Brittles, Barks and BonBons by Charity Ferreira

Butter, for pan
2 teaspoons sweet smoked paprika (pimenton dulce)
1/4 teaspoon salt
3 cups sugar
1 cup water
2 tablespoons light corn syrup
2 cups blanched slivered almonds, lightly toasted

-lightly butter a 10 by 15 inch jelly roll pan. 
-in a small bowl, stir together the paprika and salt, set aside.
-in a medium saucepan over medium-low heat, stir together the sugar, water, and corn syrup until the sugar is completely dissolved, about 5 minutes.  Increase the heat to high and boil without stirring until the syrup is golden brown (about 335 degrees on candy thermometer), 5 to 10 minutes.  When the sugar begins to brown aroung the edges of the pan, swirl the pan gently so that it carmelizes evenly.
-remove from the heat and carefully stir in the nuts and paprika mixture.  Immediately pour into the prepared pan.  Let stand at room temperature until cool and hard, about 1 hour.
-chop or break the brittle into pieces.

This brittle was a wonderful combination of sweet, crunchy, smoky and a bit salty. It is the perfect sweet bite to finish off an evening of rich food and red wine.

To finish off my dessert Tapas assortment, I stuffed a few dates with some marzipan.  I mixed a bit of orange zest into the marzipan for a little extra zing.  (Ok-I know this involves stuffing tiny things, but it is still low on the fussy scale)  These three, served on vintage metal serving plates, made for a beautiful, richly toned dessert selection.